Automatic Litter Box – Building the First Sieve Prototype
Building the first sieve prototype for my automatic litter box in 3ds Max. The goal is to test how clean litter passes through, how waste is separated, and what needs to change before prototype.
🐈 Automatic Litter Box – Building the First Sieve Prototype
I have finally started working on one of the parts that will decide whether this automatic litter box actually works or not.
The sieve.
Until now I have mostly had the idea in my head of how I want the litter separation to work.
Now I have finally started building the first actual version in 3ds Max.
And this really is the first prototype.
I am not trying to make the final sieve immediately.
The goal right now is to build something that makes sense mechanically, print it, put real cat litter through it and see what actually happens.
🧹 The Part That Actually Has to Separate the Litter
The purpose of the sieve is pretty straightforward.
When the litter reaches this section, the clean litter should be able to pass through the sieve while the larger waste stays behind.
In its simplest form:
Simple idea.
Probably not a simple thing to get right.
Cat litter is not a perfectly controlled material.
The grains are different sizes, the clumps are different shapes and everything is going to move differently once several kilograms of litter start sliding around inside the box.
So this first prototype is really about finding out how the material behaves.
🧩 Starting With the Basic Shape in 3ds Max
This is where the first prototype currently stands.
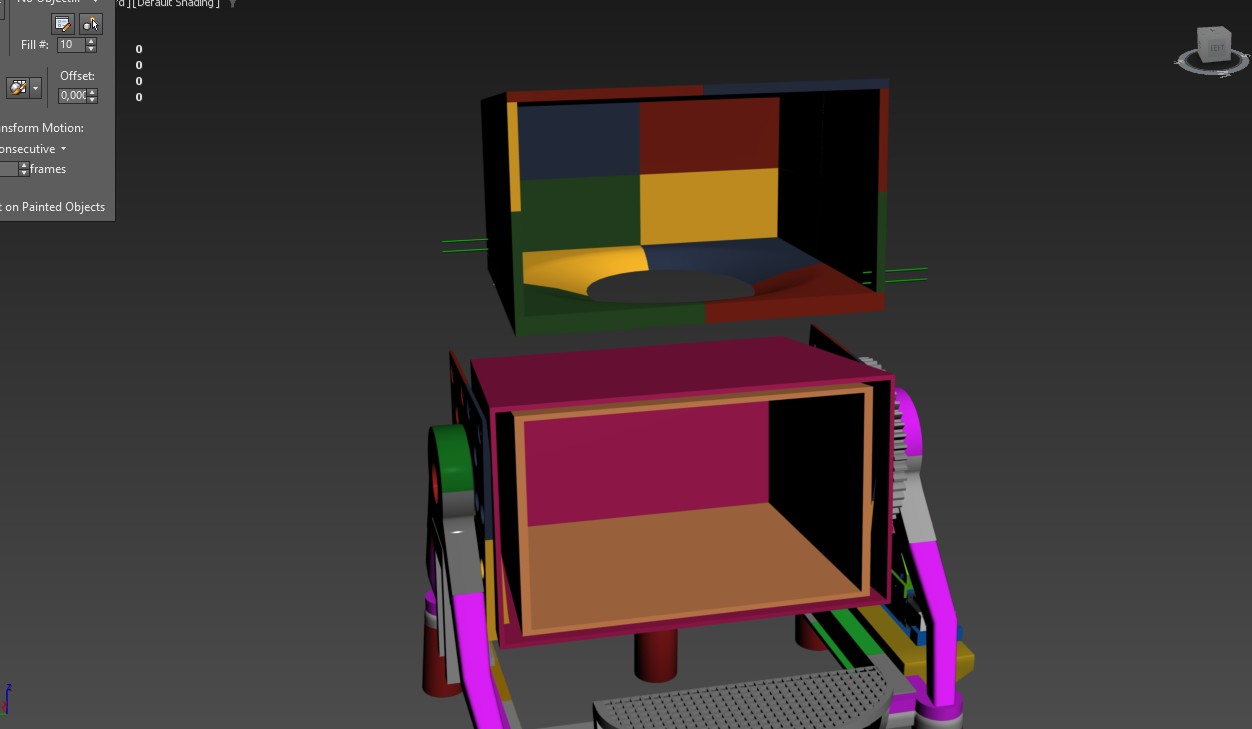 I have moved the upper section away from the rest of the litter box while working on it.
That gives me a much clearer view inside the chamber and makes it easier to build the internal surfaces without the rest of the mechanism constantly blocking the view.
Right now I am concentrating on the basic shape.
I need to figure out where the litter should move, where the sieve should sit and how much space I actually have available for the filtering section.
I do not want to start adding hundreds of openings before I know that the basic geometry makes sense.
📐 The Litter Has to Reach the Sieve First
One thing that became obvious while building this in 3ds Max is that the sieve cannot just be a wall full of holes.
The litter actually has to reach it.
If the internal shape is wrong, the litter could simply pile up somewhere else.
That would make the opening size almost irrelevant because nothing would be moving through them properly anyway.
So part of this prototype is also about shaping the inside of the litter box so gravity helps move the litter toward the sieve.
I want the internal surfaces to guide the litter rather than having random flat areas where everything can collect.
That is one reason I am spending time on the shape before worrying too much about the final hole pattern.
🕳️ The Biggest Question: How Large Should the Openings Be?
This is probably going to require the most trial and error.
The openings have to be large enough that clean cat litter can pass through without constantly getting stuck.
But they cannot be so large that the waste starts falling through as well.
That sounds obvious, but there are several things that can affect it.
The litter is not going to approach every opening straight from above.
Some grains will slide across the surface.
Some will hit the sieve at an angle.
Some will probably get stuck temporarily.
Some pieces may rotate and suddenly fit through an opening that looked too small.
Then there is the waste itself.
Different clumps are going to have completely different sizes and shapes.
So I do not think there is any realistic way of deciding the perfect opening size just by looking at the 3D model.
I need to print it and test it.
🔲 I Have Not Decided the Final Pattern Yet
The opening pattern is another thing I still need to experiment with.
There are several possibilities.
- Round holes
- Long slots
- Rectangular openings
- A grid pattern
- Staggered openings
- Some combination of several shapes
Each one changes how much material can pass through and how strong the printed part remains.
Long slots could allow litter to pass through quickly, but they could also let more unwanted material through.
Small round holes might separate better but could clog more easily.
A dense pattern gives me more filtering area, but it also removes more material from the printed part.
At this stage I do not know which one is best.
And that is exactly the point of prototype number one.
🧱 The Thickness of the Sieve Could Matter Too
Something else I have been thinking about is the thickness of the printed sieve.
If the wall is very thin, the openings behave almost like simple holes through a sheet.
If I make it much thicker, every opening starts behaving more like a small tunnel.
That could completely change how easily the litter passes through.
A grain that would fall through a thin opening might get stuck halfway through a thicker one.
So even after finding an opening size that looks promising, I may still need to change the thickness of the sieve itself.
There are quite a few variables hiding inside what initially looked like a very simple part.
🧪 This Prototype Is Supposed to Fail
I am going into the first print expecting problems.
That is not really a bad thing.
The first prototype does not need to be perfect.
It needs to show me what is wrong.
The test will probably look something like this:
I would rather discover ten problems with the first physical version than spend weeks trying to guess everything on the screen.
Once real litter starts moving through it, I will immediately have much better information.
🐈 Real Cat Litter Is Going to Decide the Design
This is one of those parts where the computer can only take me so far.
I can build the shape in 3ds Max.
I can measure everything.
I can inspect clearances.
I can make the surfaces line up exactly how I want.
But none of that tells me exactly how thousands of pieces of cat litter are going to behave when they start moving across the sieve.
That needs physical testing.
I want to see:
- How quickly the clean litter passes through.
- Whether the openings clog.
- Whether litter collects in corners.
- Whether the internal surfaces guide it correctly.
- Whether smaller waste pieces manage to get through.
- Whether the sieve needs a steeper angle.
- Whether the openings need to be larger or smaller.
Those results will decide what prototype number two looks like.
🔧 Keeping Prototype #1 Simple
It is very tempting to keep adding features while I already have the model open.
But for this first version I am trying to keep things relatively simple.
If I change twenty things at the same time and the sieve performs badly, I will have no idea which part caused the problem.
For now I mainly want answers to three questions:
Does the litter reach the sieve properly?
Does clean litter pass through it?
Does the larger material stay separated?
If I can answer those questions after the first test, I have enough information to continue.
Everything else can be improved after that.
🖨️ From 3ds Max to the First Physical Prototype
The next interesting moment will be when this stops being something sitting on my screen in 3ds Max and becomes an actual printed part.
That is when I will find out whether the shape I am building makes any sense in the real world.
And based on how this project has gone so far, I am expecting to find something I completely overlooked.
Maybe the openings will be wrong.
Maybe the angle will be wrong.
Maybe the litter will collect somewhere I did not expect.
Maybe the first version will work surprisingly well.
I genuinely do not know yet.
That is why I want to get the first prototype printed instead of endlessly trying to perfect the model.
🚧 Where the Sieve Stands Right Now
Right now the sieve development looks like this:
- Basic sieve concept
- First prototype started in 3ds Max
- Initial internal shape created
- Filtering area positioned
- Finalize prototype #1 geometry
- Add the first opening pattern
- Choose the initial opening size
- 3D print prototype #1
- Test it with real cat litter
- Check what gets stuck
- Check what passes through
- Adjust the design
- Build prototype #2
There is still a lot left to figure out.
But at least now the sieve is no longer just an idea.
The first version is actually taking shape.
🔜 Next Step: Finish Prototype #1
The next step is pretty simple.
Finish the first sieve.
Add the first set of openings.
Print it.
Then throw some real cat litter at it and see what happens.
I am almost certain that the first version will need changes.
That is fine.
Prototype number one is not supposed to be the final answer.
It is supposed to give me enough real information to build a better prototype number two.
For now, I just want to get this thing out of 3ds Max, onto the Bambu Lab P1S, and finally see how the first sieve behaves with actual cat litter.
Comments
Comments
Loading comments…